Aligning finished edges that overlap is simplified if you choose to err in favor of the overlap completely covering the underlap, rather than trying get the edges perfectly flush. I follow this rule at center front, making sure the underlap side of the front closure dips slightly down behind the overlap, and do the same with these expanding-pocket waistbands, angling the inside-waist finish above the pocket slightly downwards from the mouth forward.
This is easily done by simply angling the stitching line for the band finish (petersham in this case, but it could be anything) down a bit when sewing it on. That's why the petersham edge in this image dips out of sight below the left-most pin.
 Above the mouth and on back, I kept the petersham edge slightly above the front-band edge. When folded, the turn-of-the-cloth effect will bring the new edge level with or slightly below the tab edge; perfect.
 Inside, it looks like this:
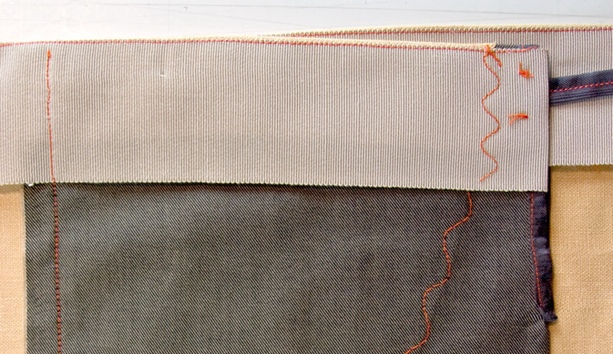 In front, the raw end of the petersham, cut long enough to wrap around the inner edge of the front slit, gets zigzagged down. I used a long serpentine stitch here, and along the packet-facing's raw edges, as much for decorative effect as anything, but this'll work very well on garments that aren't washed, and well enough on garments that are. I've tried all sorts of side-to-side stitches for these edge-tacking, edge-finishing roles and none of the choices or stitch-length/densities I've tried has ever failed in practice, so going with decorative's as good a way to select these as any. But if eventual slight fraying troubles you, choose a denser stitch or setting. In any case I see no reason to ever fold such an edge under before stitching it down.
 That eye hardware in front is the first step in a simple strategy for keeping the inside band from slipping or folding down in front, while you're wearing the pants or putting them on. The rest of it is that folded strip of seam binding (could be a lining selvedge or any thin fabric; seam binding's just right if you've got it) secured on one end to the front petersham layer. This gets fed through the eye opposite and secured by hand to just the petersham in front when all else is finished.
 So, what keeps the lower edge of the petersham secure? The tab stitching certainly helps, as will any seams that catch the petersham at the center-front closure. Beyond those, you don't need much, if anything; I'm usually content with just a few tacks here and there, such as you'd get from stitching in the ditch of the side seam to hold the pocketing, from stitching those buttons on through all layers, from belt loops if they're used, and that sort of thing. You could stitch all along, or in, the ditch of the band/garment seam, at least in front here where there is such a seam, but I usually don't bother, especially since in this case that would make it a bit more bothersome to tack down that seam-binding strip in front; it's easy when the petersham's open there. In general, my pant-sewing has evolved from super-ultra bullet-proof to quite minimal over the years, and and I'm happy about it, but choose your own level of tack-things-down security. They're your pants!
Tomorrow: Options and wrap-up.

No comments:
Post a Comment